零信任安全是当下一个比较火热的话题,很多厂家都在尝试将其落地,整合到企业安全框架之中,实现产品化。零信任安全其中一种比较可行的实现方案是通过SDP(Software Defined Perimeter),本文尝试通过现有的开源组件实现SDP。
参考模型
本次尝试主要参考以下模型:
工具列表
fwknop - Used to allow the SDP server to remain completely hidden from unauthorized use. With this tool, the gateway server can be configured with 0 inbound port access. The net result is that the gateway server is more hardened against port scanning, DDoS attacks, etc. This component will be optional as the client component is not readily available on all major platforms (ie. iPhone). This project is definitely worth a look for anyone looking to contribute to a really awesome open source project!
Squid - Used to provide authorization to upstream resources. Squid is being used because of it’s ability to use external authentication helpers and assign access based on group memberships from either a common database, or LDAP server. Squid also gives us the granularity to apply rules based on destination host, URI, port or a combination.
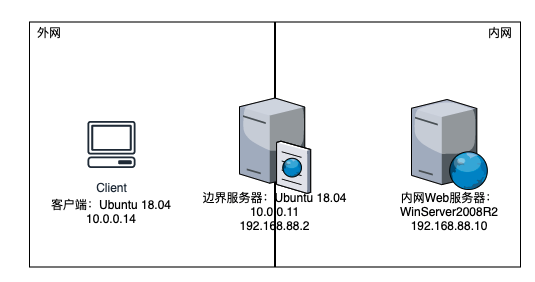
测试拓扑
方案简述
网络边界部署边界服务器,在边界服务器上安装Squid反向代理内网Web服务。同时在边界服务器上安装并开启fwknop-server,在客户端上安装fwknop-client,通过配置实现单包认证访问。
测试步骤
Step 1
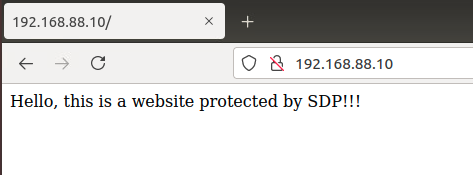
网络拓扑比较简单,就不赘述搭建过程,进入正题。在内网Web服务器上搭建HTTP网站,关于如何在Winserver 2008 R2上搭建网站也很简单就直接跳过。现在我们搭建好的网站是这样的:
Step 2
在边界服务器上安装Squid,由于本次边界服务器是Ubuntu系统,所以输入sudo apt isntall squid即可。然后通过sudo vim /etc/squid/squid.conf命令修改squid的配置文件。
1 | #http_port 3128 |
修改完成后通过sudo systemctl restart squid命令重启squid,这时候访问http://10.0.0.11就可以看到Step 1中搭建的网站。至此,HTTP反向代理就完成了。
Step 3
本次测试选用的客户端是Ubuntu,直接通过sudo apt install fwknop-client即可安装fwknop的客户端,本次测试安装的是2.6.9版本。如果是Windows端则要去fwknop官网去下载源代码自行编译。
安装好fwknop-client之后执行sudo fwknop -A tcp/80 -a 10.0.0.14 -D 10.0.0.11 --key-gen --use-hmac --save-rc-stanza生成单包认证的Key。命令执行完之后会生成一个.fwknoprc文件,同时会告知文件位置。
1 | -A tcp/80 请求服务端打开的端口及其协议; |
通过sudo grep KEY /home/User/.fwknoprc命令即可获取Key。

Step 4
在边界服务器上通过sudo apt install fwknop-server安装fwknop服务端。然后输入sudo vim /etc/fwknop/access.conf修改服务端参数,将Step 3中客户端的Key加入配置文件:
1 | SOURCE ANY |
然后还需要修改/etc/feknop/fwknopd.conf文件,将监听的网卡修改为机器外网网卡:
1 | # Define the ethernet interface on which we will sniff packets. |
最后通过iptables实现对80端口的隐藏:
1 | sudo iptables -I INPUT 1 -i ens33 -p tcp --dport 80 -j DROP |
运行sudo fwknopd reload命令重启fwknopd服务,可通过sudo fwknopd -S命令查看服务状态,通过sudo fwknopd --fw-list-all命令查看iptables规则。
这样边界服务器的设置就完成了。
Step 5
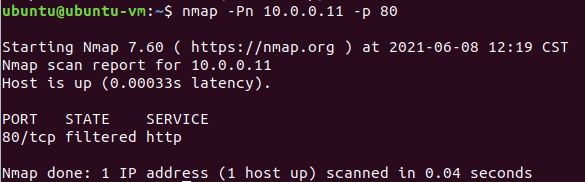
此时所有地址都无法访问边界服务器的HTTP服务,nmap扫描的结果如下:
而当我们在client上执行sudo fwknop -n 10.0.0.11命令发送单包认证后,会发现此时80端口已经对client开放(如果不做任何操作30s后会自动关闭,更多配置在服务端的fwknop配置文件中):
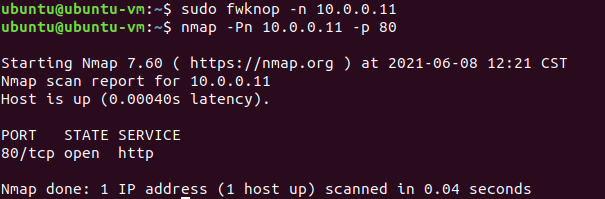
这个时候client就可以访问到搭建在内网的HTTP服务了。
后记
结合下面的代理工具我们可以实现一些自动化以及非Web服务的单包认证机制。
OpenVPN - Used to ensure a completely encrypted communication channel between personal devices (laptop, cell phone, etc) and the gateway server. OpenVPN includes support on every major platform and is simple to adjust the configuration to the user’s needs. In our model, we are not using OpenVPN in the traditional sense of a VPN as the gateway server will not be configured to forward traffic directly to an upstream device. OpenVPN also supports additional authentication plugins allowing things like two-factor authentication to become possible. OpenVPN also provides the awesome PKI tool easy-rsa. easy-rsa gives us the ability to provision and manage certificates for all of our components.
Redsocks Proxy - This tool will be used to forward non-web traffic through our Squid proxy.
以及更多的fwknop指导在这里。